CLOUD Configure SAP for the connection with Jira
Preparation for the Jira communication
In addition to importing the transports, minor adjustments must be made after installation.
| Procedure | Example | |
|---|---|---|
| 1 | Typically, the SAP instances are protected by a firewall. In order for communication to be possible, make sure that Jira can access the SAP system via HTTP. In general the best way to do this is to contact your internal IT department. | |
| 2 | Create a Communication user with role /IX2/JTMS_SERVICE for Jira in SAP with minimal permissions for the communication with Jira. This user will be used to modify transports and is stored in per SAP system. User mapping via email address Optional: In general the email address of a Jira User is automatically mapped to the email address of the SAP User. But sometimes email addresses are assigned twice in SAP systems. If this is the case, the role /IX2/JTMS_SERVICE must also be assigned to a user so that we can clearly identify a user. To be on the safe side, assign the role to all relevant users. If a static mapping is sufficient, this can be stored within the configuration in Jira. | |
| 3 | You need to make adjustments to the role /IX2/JTMS_SERVICE for future updates via the transaction PFCG. Change the physical filename in the permissions for file access (technical name: S_DATASET) to match you SAP Systems transport directory. You can find the transport directory in the directory assigned to the parameter DIR_TRANS in transaction AL11. Make sure to add /* for Unix/Linux or \* for windowssystems to the path. | |
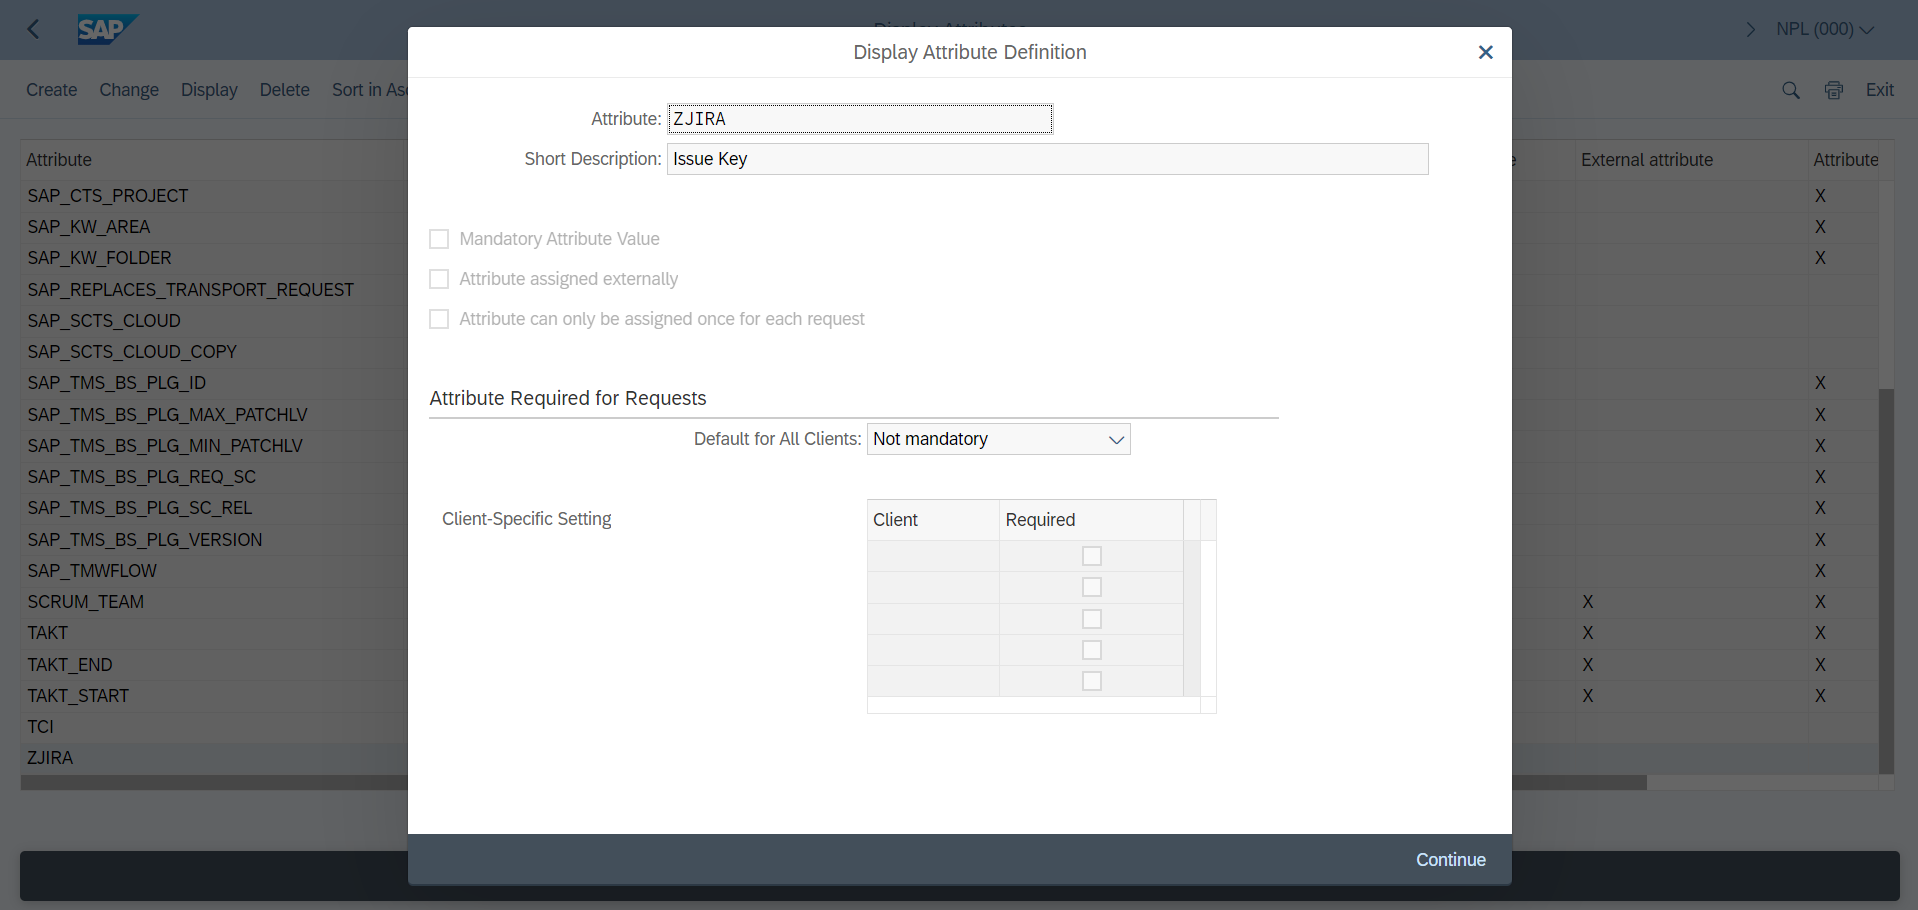
| 4 | Create a Attribute to store the linked Jira issues via the transaction SE03. In the Administration area, select Display/Change Request Attributes and create the new attribute with e.g. the name ZJIRA. |
|
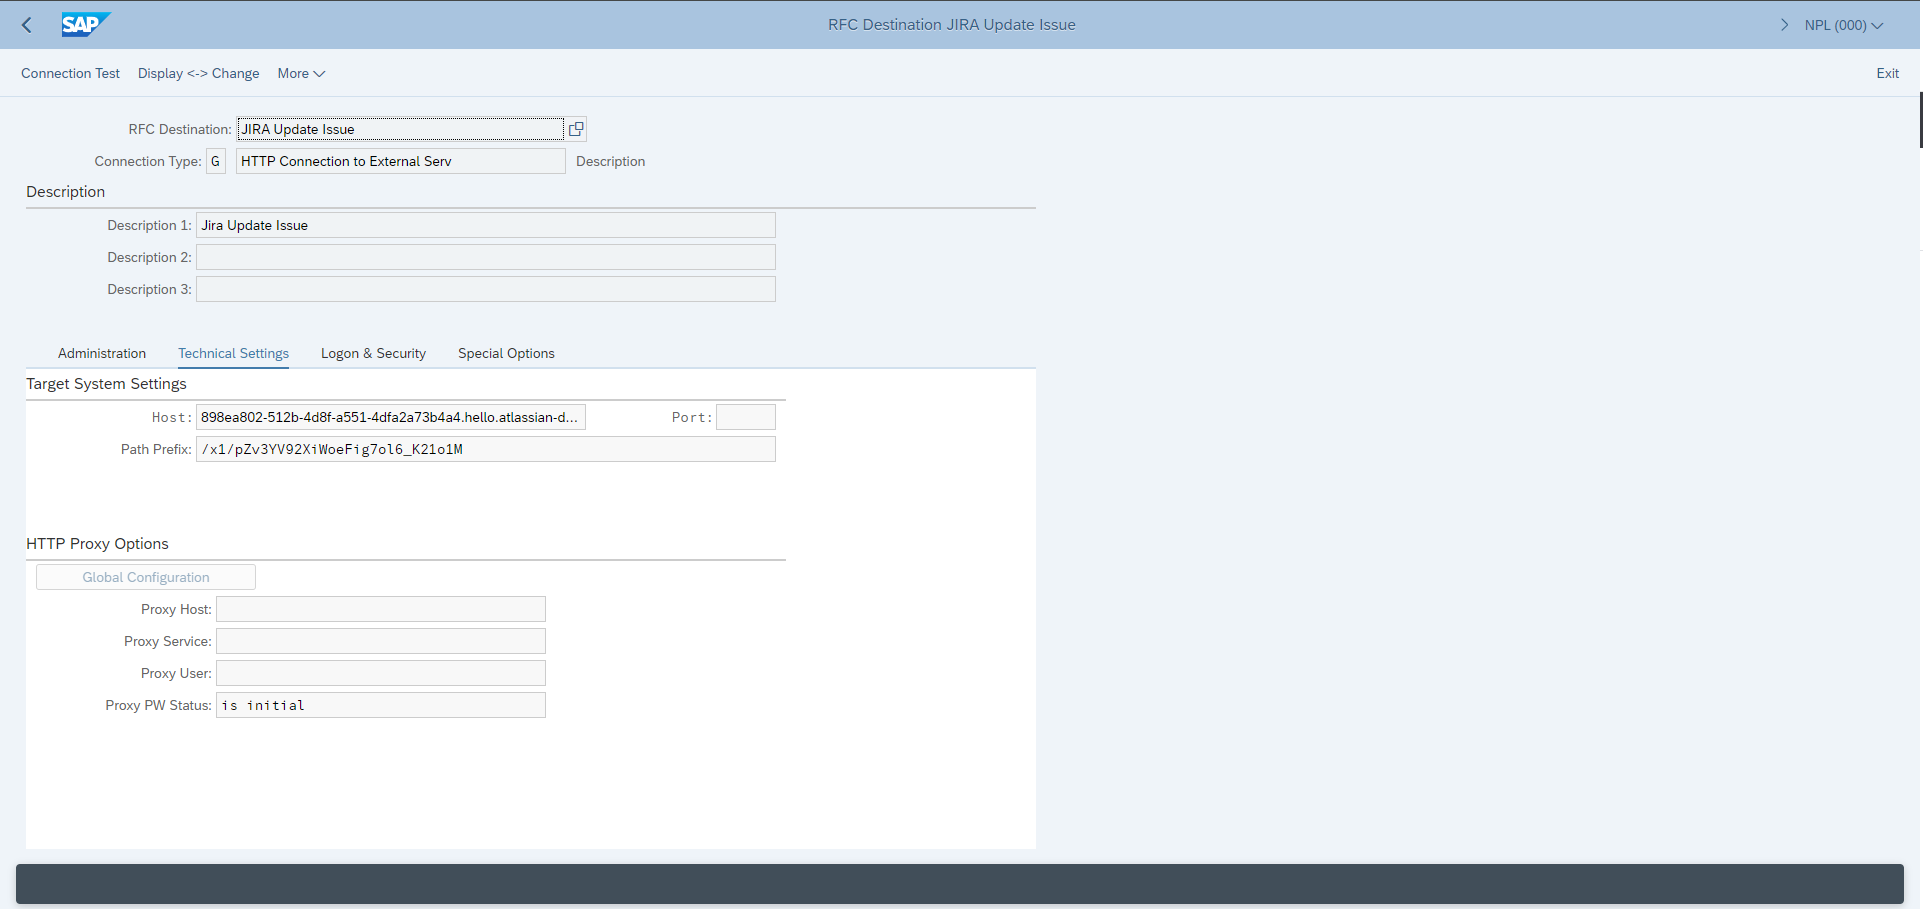
| 5 | Create a RFC destination with the name JIRA Update Issue and type G that points to Jira via the transaction SM59. Therefore define the Host and Path Prefix. There is no Logon Procedure necessary in this form, because it is done via an API Token in the sepearte SAP Transport Panel Setting in SAP. See the section SAP Transport Panel Customizing on this page for further information. The Request URLs are randomly generated for each App installation. Therefore the Request URL can be found in the app configuration of your Jira system Settings → Apps → SAP Transport Panel → API settings → Request URL. Afterwards you need to split the Request URL into Host and Path Prefix for the setting of the RFC destination in SAP. Also go to the Special Options Tab and set the Compression Status to Inactive, so SAP will not compress the data. |
|
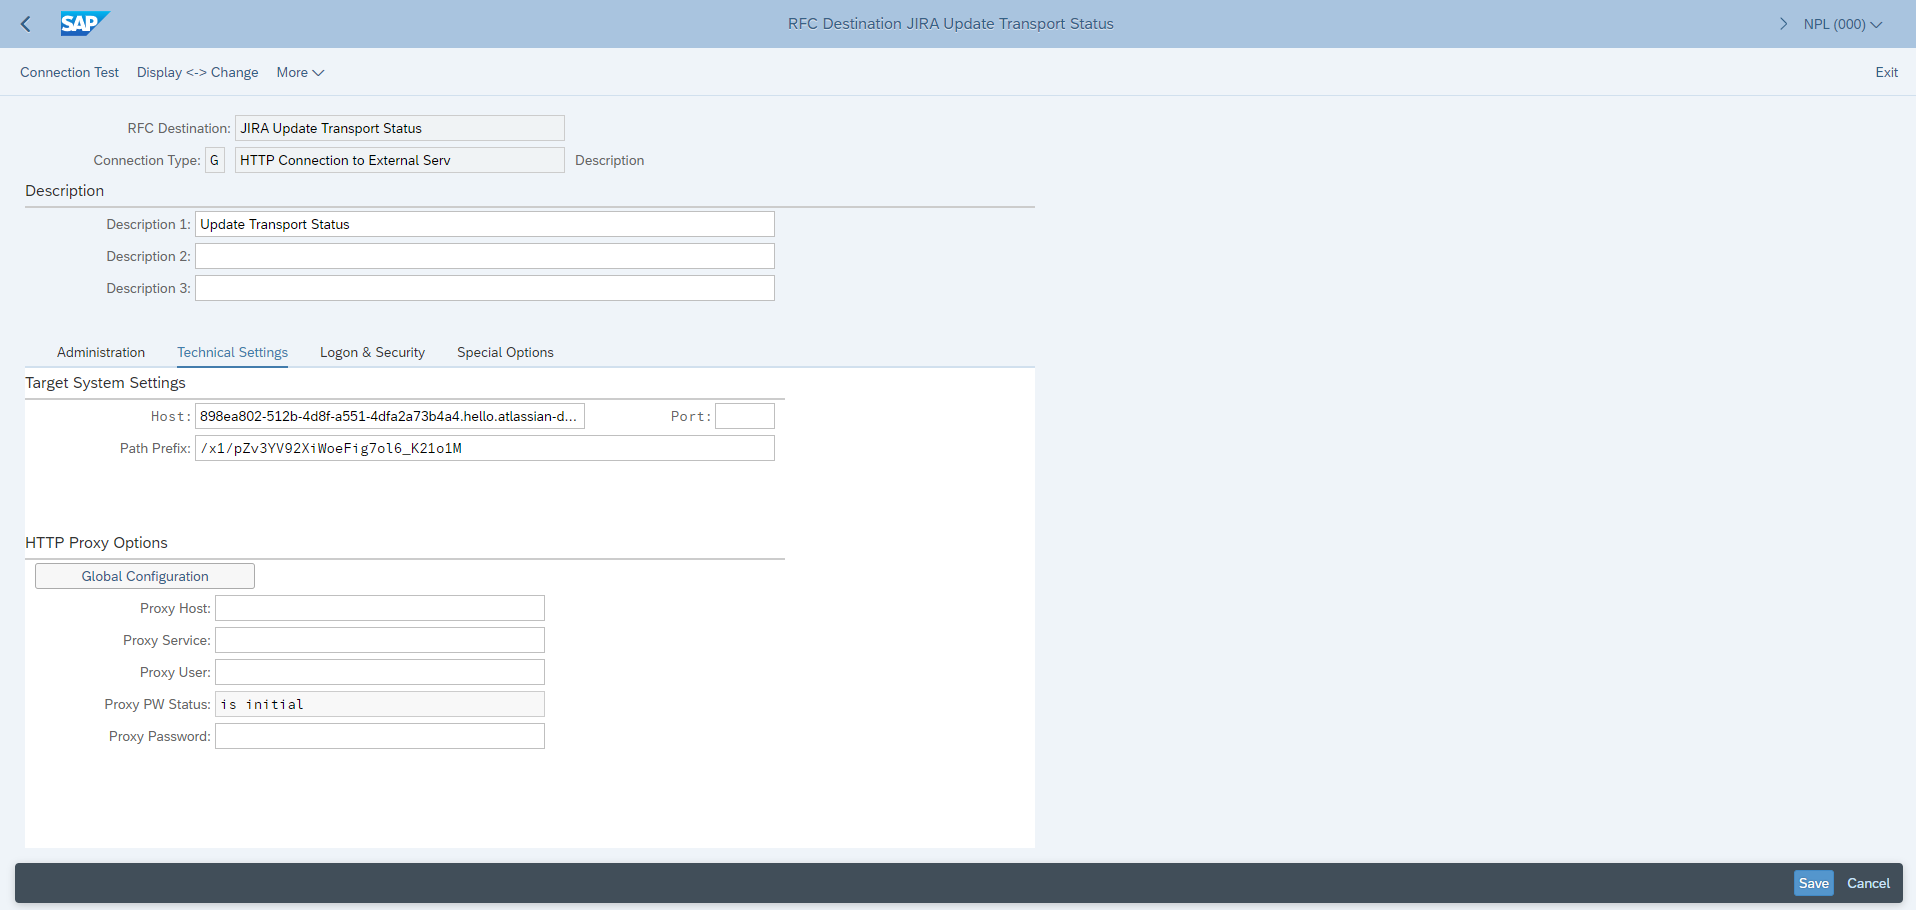
| 6 | Create a RFC destination with the name JIRA Update Transport Status and type G that points to Jira via the transaction SM59. Therefore define the Host and Path Prefix. There is no Logon Procedure necessary in this form, because it is done via an API Token in the sepearte SAP Transport Panel Setting in SAP. See the section Configure Import Feedback on this page for further information. The Request URLs are randomly generated for each App installation. Therefore the Request URL can be found in the app configuration of your Jira system Settings → Apps → SAP Transport Panel → API settings → Request URL. Afterwards you need to split the Request URL into Host and Path Prefix for the setting of the RFC destination in SAP. Also go to the Special Options Tab and set the Compression Status to Inactive, so SAP will not compress the data. |
|
| 7 | You may have to add the SSL Certificates of the external websites to your SAP System to allow access to them. To do so please follow these instructions: https://community.sap.com/t5/devops-and-system-administration-blogs/adding-website-public-certificates-to-abap-stack/ba-p/13423643 | |
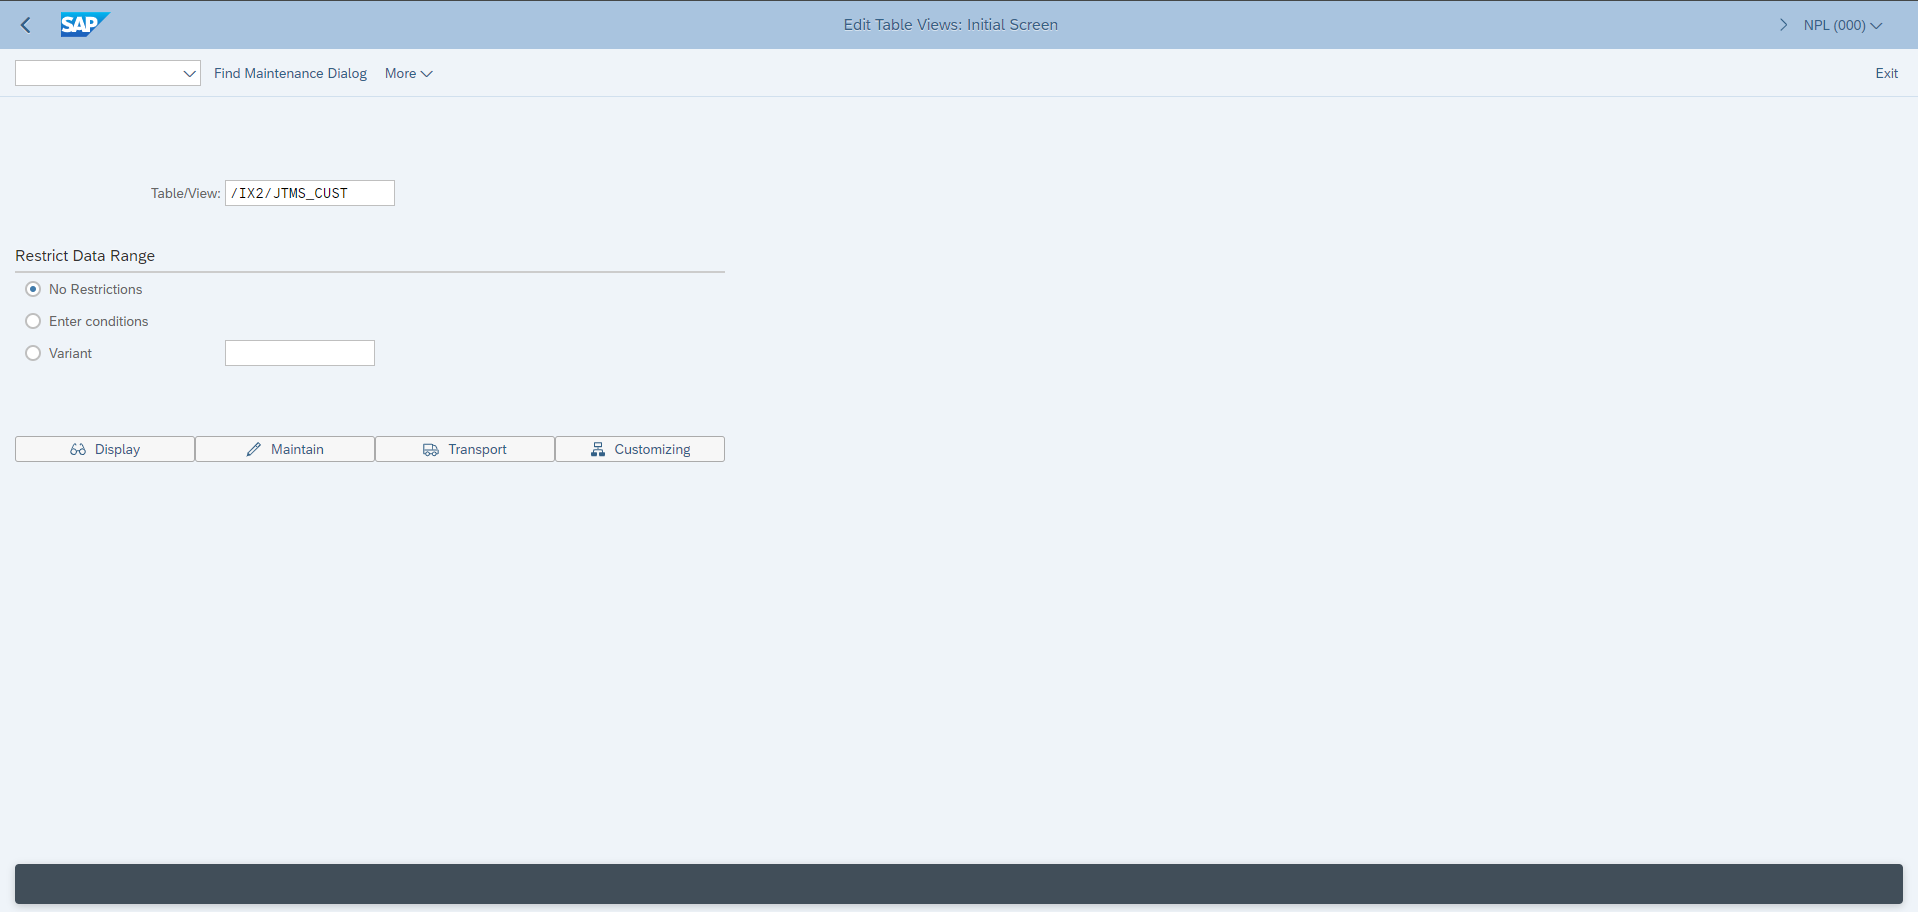
| 8 | SAP Transport Panel is shipped with a default configuration that can be adjusted as you wish via the transaction SM30. See the section SAP Transport Panel Customizing on this page for further information. |
|
| 9 | If you want to see the Return code of SAP transports imported on your productive System in Jira, you need to activate the BAdI CTS_IMPORT_FEEDBACK in your productive SAP System. See the section Activate Import Feedback on this page for further information. | |
| 10 | Add a Schedule Job to ensure updates to Jira via the transaction SM36, when changes are done in SAP. See the section Schedule Update Job on this page for further information. |
SAP Transport Panel Customizing
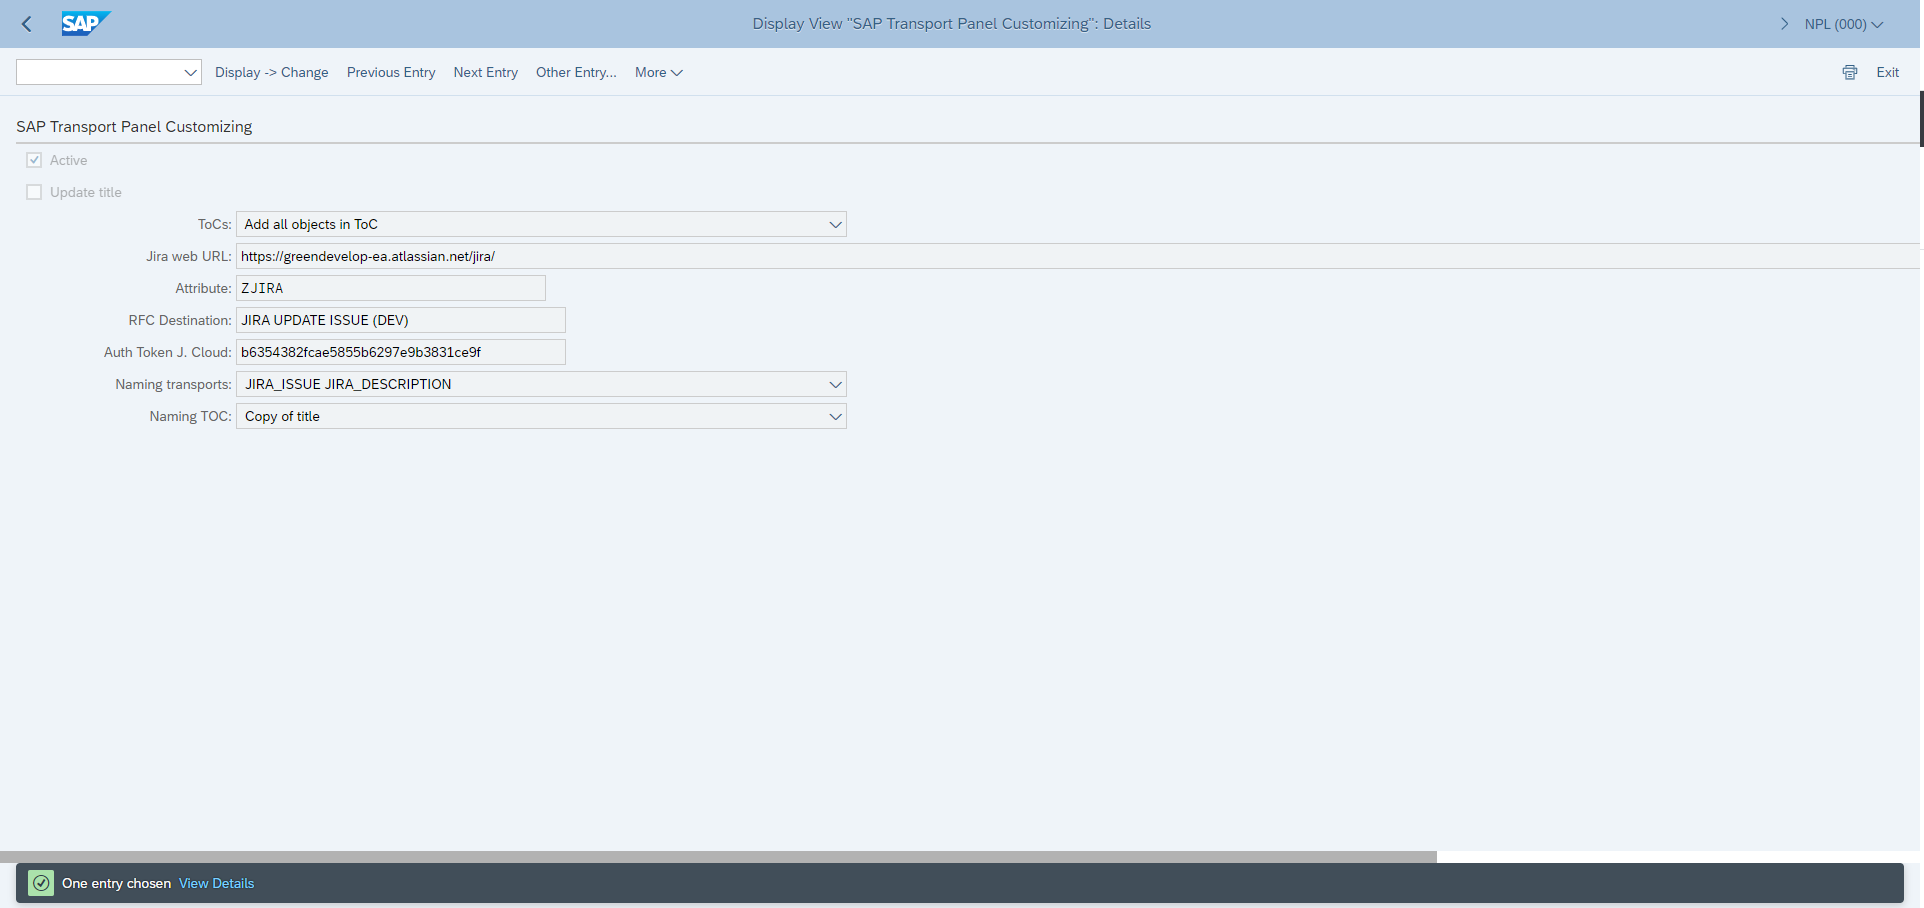
SAP Transport Panel is shipped with a default configuration that can be changed by editing the table contents of the SAP Transport Panel Customizing View /IX2/JTMS_CUST in the transaction SM30. If you develop on multiple systems this customizing needs to be adjusted on each system.
| Field | Description | Example |
|---|---|---|
| Active | Enable or disable the whole functionality. |
|
| Update Titel | The Titel of the issues and Transports will be updated. Enable or disable the functionality via this checkbox. | |
| ToCs | Select whether all objects or objects in active transport tasks should be released when the creation of a transport of copies is triggered by Jira. | |
| Jira web URL | Atlassian Jira is started when a issue is selected in the SAP transport by double-clicking on it. Here you enter the path to Atlassian Jira, where the issues can be found. | |
| Attribute | For the Jira issue link SAP Transport Panel uses the transport attributes. Enter the name for the created attribute in this field. | |
| RFC Destination | Store the created RFC destination for Update Issue for communication with Jira. | |
| Auth Token J. Cloud | For authenticated connection with SAP Transport Panel for Jira Cloud, you have to generate a token in SAP Transport Panel. | |
| Naming transports | Select a naming convention for a transport created via Jira. | |
| Naming ToC | Select a naming convention for a transport of copies created via Jira. |
Schedule Update job
If you want your SAP system to update the Jira issues according to changes that where made in SAP and not in Jira you need to schedule a SM36 job in your development systems with the following parameters. If you develop on multiple systems this job needs to be added on each system.
| Parameter | Setting |
|---|---|
| Job Name | JTMS_UPDATE_JIRA_TRANSPORT_STAT |
| User | Enter a user with the permissions of the role /IX2/JTMS_SERVICE. |
| ABAP Program | /IX2/JTMS_UPDATE_JIRA_TR_STATU |
| Variant | Leave this empty. The default settings will update all transports modified in the last year. |
| Period | Set to "Each hour" or shorter interval. |
Configure Import Feedback
If you want to see the Return code of SAP transports imported on your productive System in Jira, you need to activate the BAdI CTS_IMPORT_FEEDBACK in your productive SAP System and set a RFC destination.
Activate Import Feedback
Activate the BAdI CTS_IMPORT_FEEDBACK in your productive SAP System.
| Procedure | |
|---|---|
| 1 | Call the transaction SE18 |
| 2 | Enter BAdI Name CTS_IMPORT_FEEDBACK |
| 3 | Select Display |
| 4 | Navigate to Implementation → Change |
| 5 | Select /IX2/JTMS_BADI_IMPRT and press Continue |
| 6 | Click on Activate Business Add In Implementation |
Set RFC destination
Store the created RFC destination for Update Transport Status for communication with Jira.
| Procedure | Example | |
|---|---|---|
| 1 | Call the transaction SM30 | |
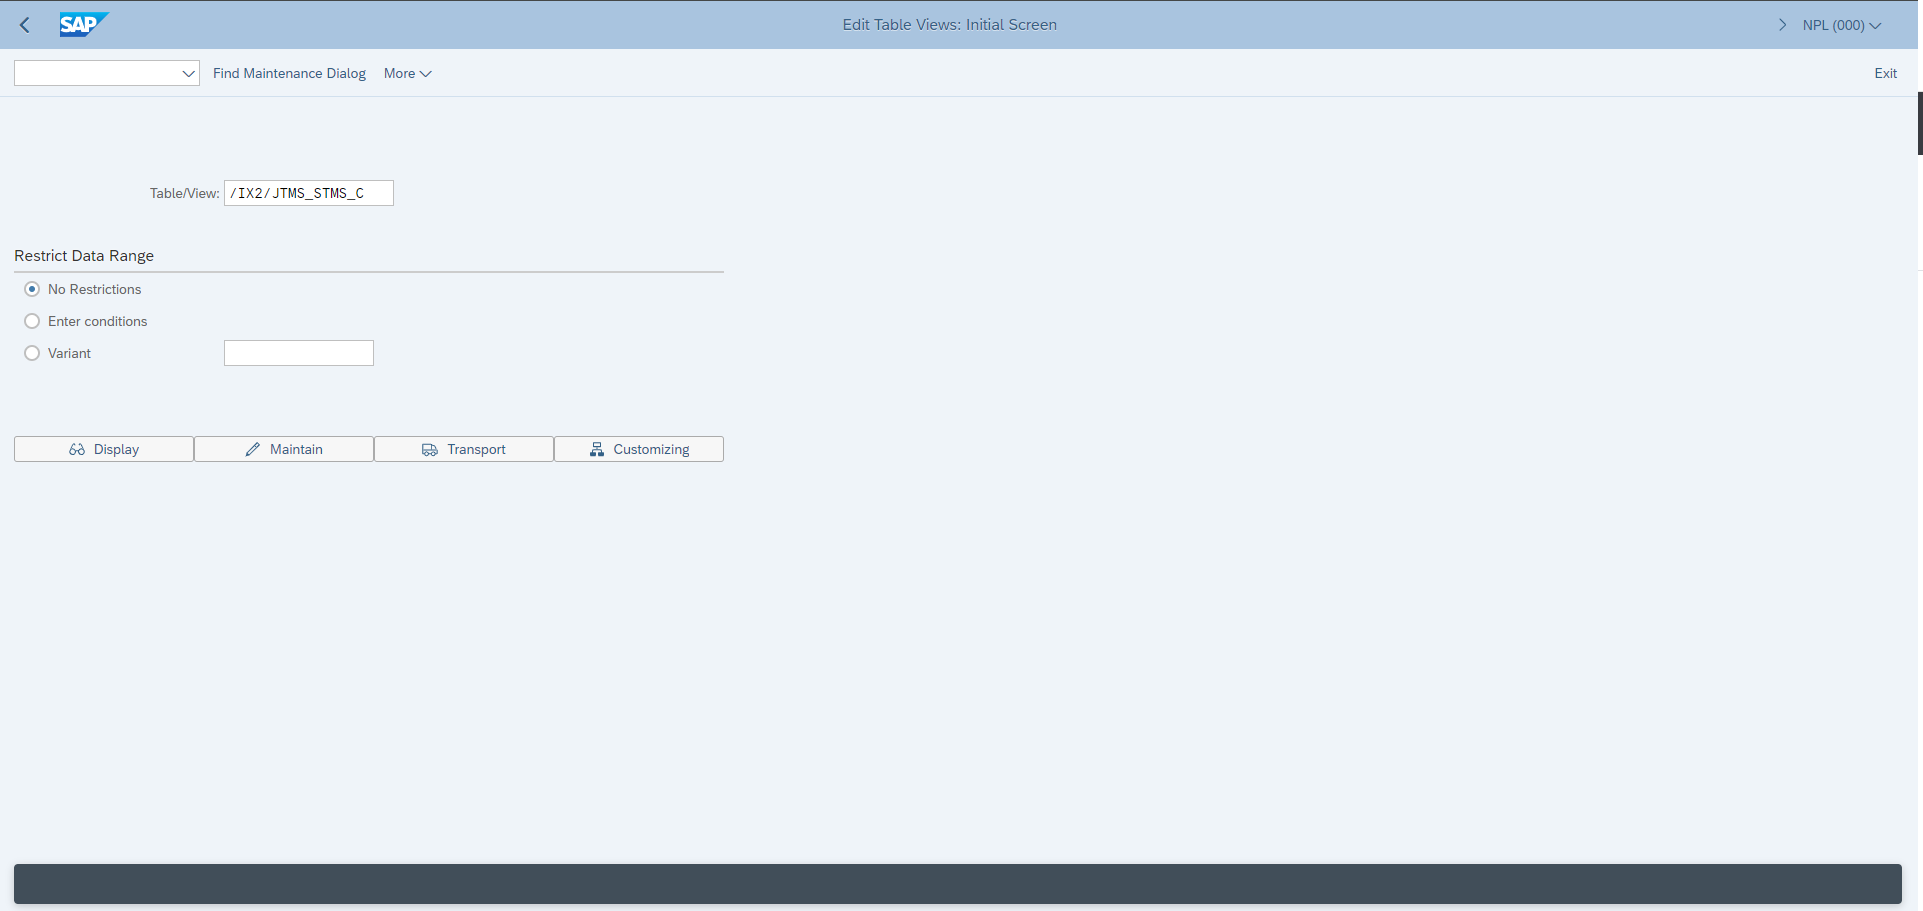
| 2 | Enter Table /IX2/JTMS_STMS_C and press Maintain |
|
| 3 | Store the created RFC destination and the Auth Token from Jira Cloud for communication with Jira. For authenticated connection with SAP Transport Panel for Jira Cloud, you have to generate a token in SAP Transport Panel. | 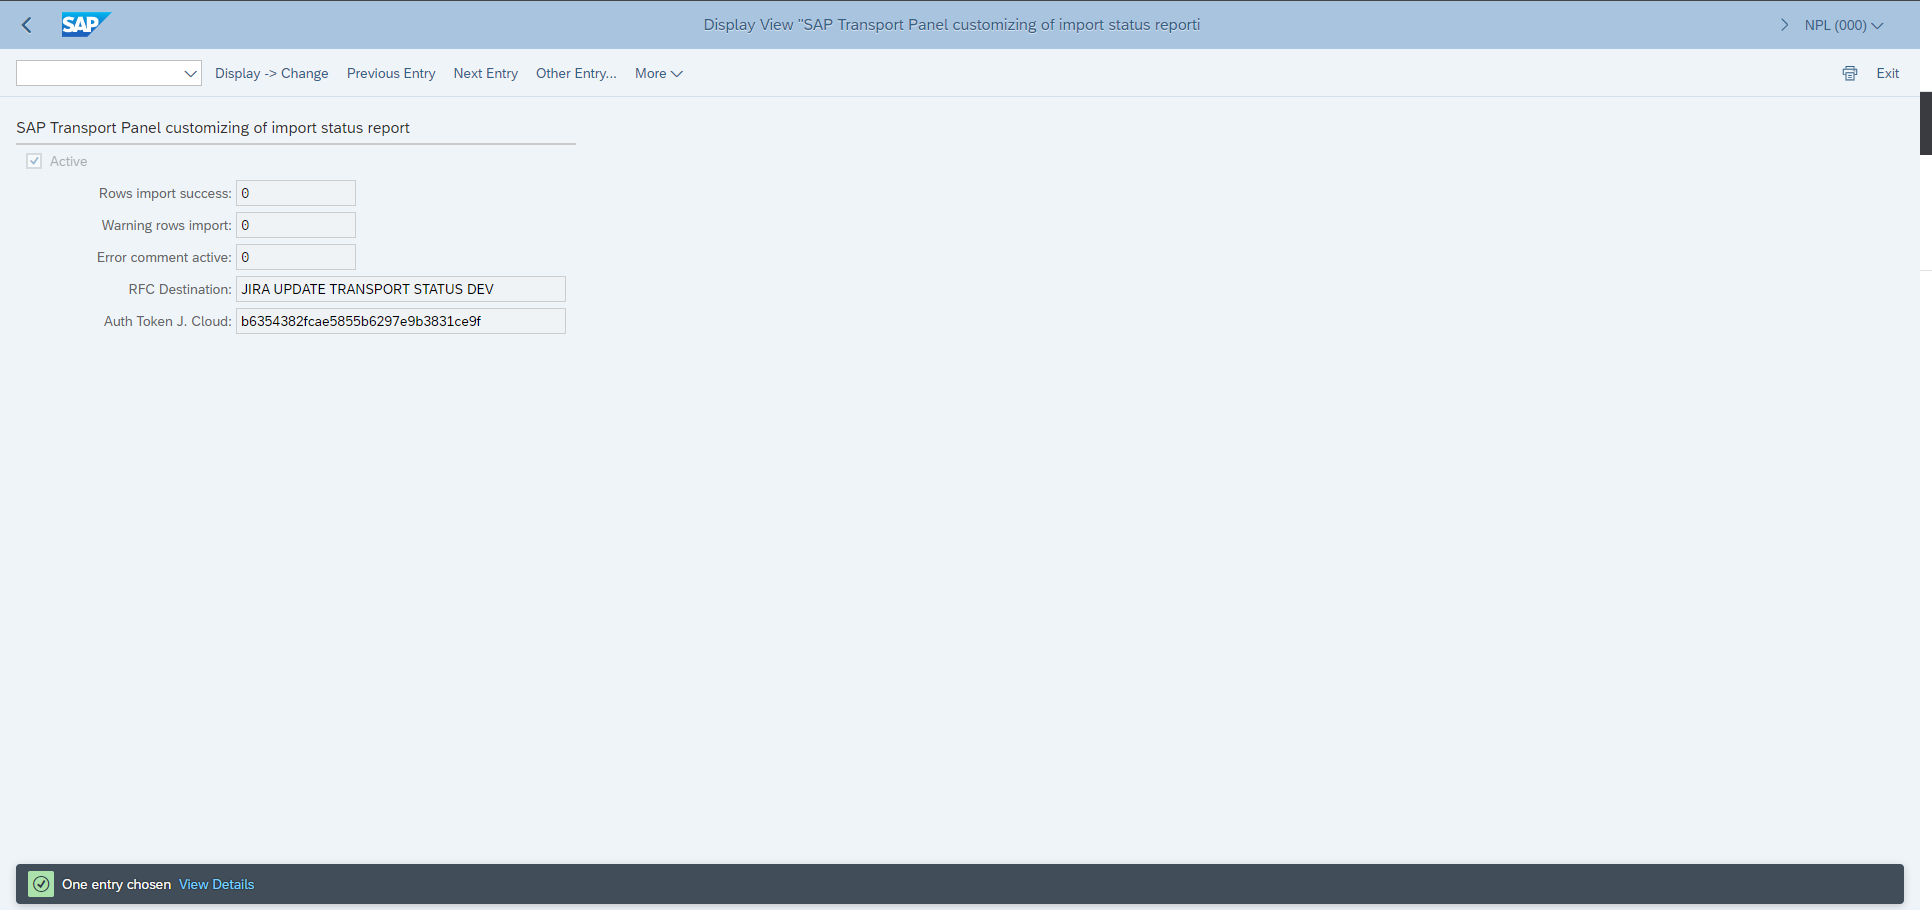 |
| 4 | Save your settings |
Configure Import Feedback for Transports of Copies
If you want to see the Return code of Transports of Copies imported on your quality System in Jira, you need to activate the BAdI CTS_IMPORT_FEEDBACK in your quality SAP System and set a RFC destination.
Activate Import Feedback
Activate the BAdI CTS_IMPORT_FEEDBACK in your quality SAP System.
| Procedure | |
|---|---|
| 1 | Call the transaction SE18 |
| 2 | Enter BAdI Name CTS_IMPORT_FEEDBACK |
| 3 | Select Display |
| 4 | Navigate to Implementation → Change |
| 5 | Select /IX2/JTMS_BADI_IMPRT and press Continue |
| 6 | Click on Activate Business Add In Implementation |
Set RFC destination
Store the created RFC destination for Update Transport Status for communication with Jira.
| Procedure | Example | |
|---|---|---|
| 1 | Call the transaction SM30 | |
| 2 | Enter Table /IX2/JTMS_STMS_C and press Maintain |
|
| 3 | Store the created RFC destination and the Auth Token from Jira Cloud for communication with Jira. For authenticated connection with SAP Transport Panel for Jira Cloud, you have to generate a token in SAP Transport Panel. |  |
| 4 | Save your settings |

